Managing Themes and Wallpapers with Hoverdesk:
You can include a wallpaper in same directory as your theme and when you change to that theme the custom wallpaper will be loaded with that theme. Hoverdesk will read a .bmp or a .jpg file, convert it to .bmp format and instruct Windows to use it as the wallpaper while Hoverdesk is running. If you close Hoverdesk, you old wallpaper will be restored. To add this function to a theme or change the image you'll need to access the Theme Manager.
HoverDesk Theme Saving :
When HoverDesk is saving your theme, all textures / icons which
are not located in your theme folder will be
automatically copied in your theme folder ! This way, you can be sure that
when you'll export your theme, it will include all the necessary bitmaps / icons inside
the zip!
The Theme Manager:

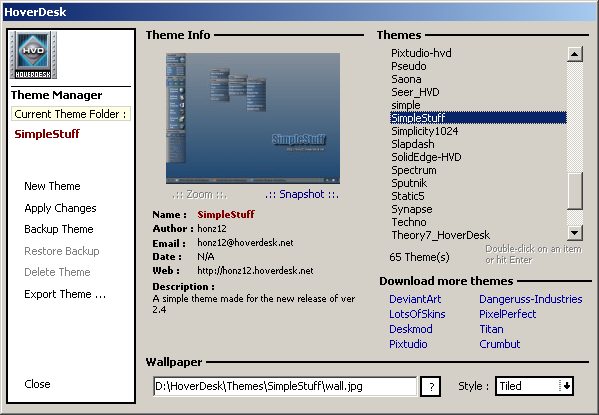
Within this dialog, you can change your current theme, back up a theme prior to maiking changes, restore that back up, specify your wallpaper and its properties and enter any custom theme information you require. This dialog will alsoallow you to create a preview image and a full size screenshot as well as package your theme for export and upload to skin sites
New Theme: You will be prompted to name your new theme (often the hardest part), and fill in the author / description details within the Theme Info section.Then just click Create!. A default theme will be created with several common default tiles in place (Template Theme). Now create your theme by dragging and dropping applications (.exe files) icons and custom bitmaps you have created, onto tiles. Create new tiles by dragging .exe files to the main tile.
You may wish to include a custom wallpaper. Don't forget to customize the appearance of the plug-ins and the taskbar.
Apply Changes:
This command applies the selected theme, wallpaper image, or updates the theme info after
changes are made.
Backup Theme: This function creates a
backup of the theme's configuration files (not the images) so you can experiment with
differetn settings yet return to a previous configuration if you desire.
Delete Theme: Does just that. Bye,
bye theme.
Export Theme: Integrated Export
Theme feature : HoverDesk can now export your theme by zipping the folder, generating a
full snapshot (if not already existing) and will copy the zip file & snapshot inside a
directory called Export (inside your main HoverDesk directory). If your theme already
includes a full snapshot, then HoverDesk will place it into the zip file too. If not, then
HoverDesk will take a full one but won't include it in the zip file.
When Exporting a theme via the Theme Manager, HoverDesk will create a file called yourtheme.HvD (in fact, the .Zip file is renamed into a .HvD one). A double-click on a .HVD file will automatically install the theme !
Theme Info:
Snapshot: HoverDesk can now take a snapshot of your theme and will
display a preview (thumbnail) inside the Theme Manager. Please read carefully the snapshot
options in the dialog box.

Theme Info: This Editable
field contains Theme information about the current theme. You should choose to include
this information with themes you intend to share or to obtain information about the
current theme.
Themes: This menu lists the themes you have installed in your HoverDesk directory (more on installing themes). To change themes, highlight your selection and click the Apply Changes button or double click the desired theme.
Wallpaper: Here, you may browse for .jpg or .bmp images you wish to use as wallpaper. You may also select the display mode from the drop down menu.
You can include a wallpaper in same directory as your theme and when you change to that theme the custom wallpaper will be loaded with that theme. Hoverdesk will read a .bmp or a .jpg file, convert it to .bmp format and instruct Windows to use it as the wallpaper while Hoverdesk is running. If you close Hoverdesk, your old wallpaper will be restored.
The Template theme is what Hoverdesk uses to create the basis for new themes. You should customize this template to suit your commonly used applications and tiles. Once this is done, new themes you create, will include all your personal favorites. Theme creation is simply drag & drop after that!